What's CDN?
CDN is an abbreviation for Content Delivery Network. This is a service with the main purpose to speed your site up throughout the world. The following article describes what's CDN and how to set this up on your Joomla and WordPress sites.
First, let's explain in short how CDN service decreases time needed for your site to load. Every hosting provider has servers that can be located anywhere in the world. For better accessibility and faster loading time of your site, it's recommended for your site to be physically hosted near the location from where most people are accessing it. It's clear why is that so. If a website is hosted in London, the UK, its HTML pages or JavaScript files or CSS stylesheets or images will be loaded faster for visitors who are from England (or France, or some other near location), than for those who are from Australia or California. If a website offers some services or goods related to California only, the webmaster should select a web hosting provider that has servers located in California (or Texas, or some other near location). In this case, the webmaster will not worry too much if the website responds slowly to the visitors from Europe (or Russia, or some other far location).
However, there are many websites that operate worldwide. In this case, all the visitors of such websites are evenly valuable to the website owners. They should take care of loading time and optimize it for all parts of the world. This is where the CDN service becomes interesting and very usable.
How CDN works?
The CDN providers have servers located on all continents, in all important nodes throughout the world interesting for Internet traffic. When website owners decide to use a CDN service, the CDN provider "takes" all heavy content of the site (images, video, audio, JS files, CSS files, etc.) and copies them onto all the servers located in the various parts of the world. You can guess what's happening next. Even if a website is hosted in Texas, the USA, when a visitor located in Melbourne, Australia accesses the website, all heavy content will be transferred from the nearest location in Australia. The heavy content of every website usually takes over 90% of all website content, therefore, in this case, the CDN service will speed up the site for the visitor from Melbourne. The visitor will have a feeling the site was hosted somewhere in Australia, not in Texas, thanks to the CDN service!
Advantages of the CDN
Faster loading time of website could improve search rankings because search engines don't like sites that are loading slowly. But, most importantly, it increases the usability of the website throughout the world. When any website is slow, visitors usually leave it earlier because they don't want to spend time waiting for all content to load. The user experience of the visitors who are accessing the website from a location that's far away from the server location will be increased by using a CDN service.
How to create a zone using MaxCDN control panel
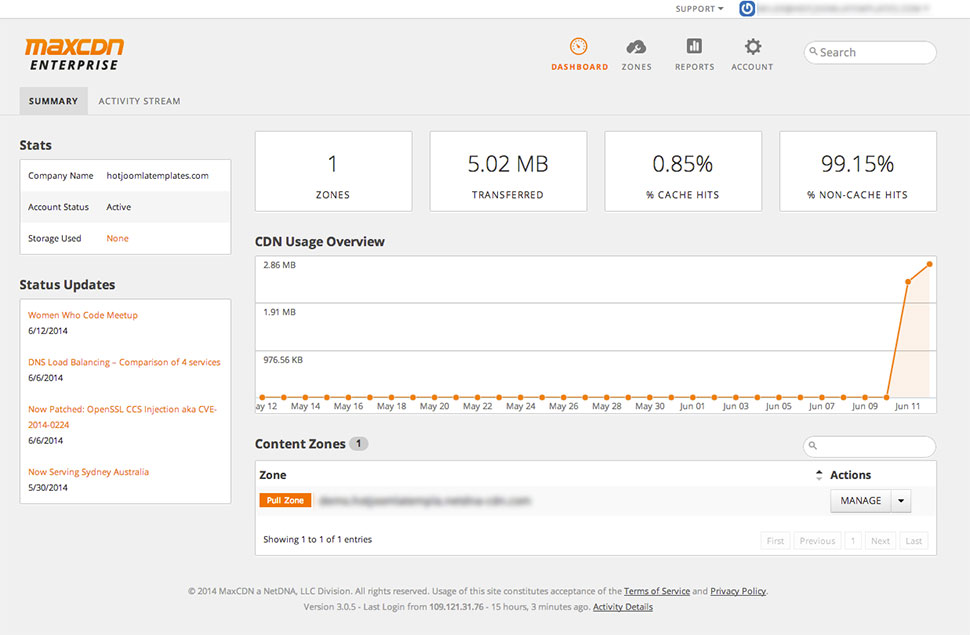
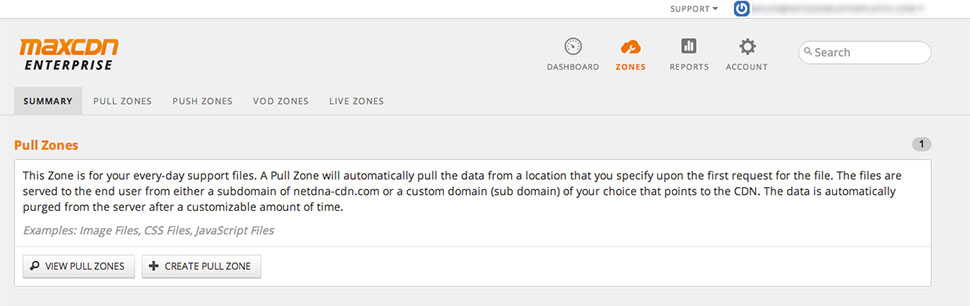
Thanks to the guys from MaxCDN, we have had a chance to test their CDN service on our Joomla sites and also on our WordPress sites. After signing up for the MaxCDN service, you can log in to your dashboard and click the Zones icon to create your first zone.
Now, click the "Create Pull Zone" button.
The following screen will be shown:
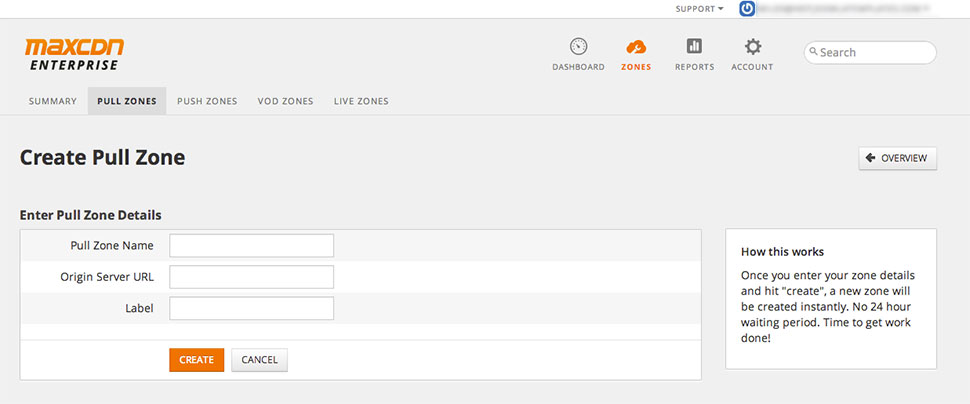
You will see 3 fields. For Pull Zone Name, you can enter one word that describes your zone, for example, your site name without spaces. For the Origin Server URL, you should enter your website URL. For Label, you can enter any text that describes your site, so you can recognize it if you have more than one site. Once your zone has been created, you would see it in the Content Zones box. This box also contains your zone's URL. This is a link that looks like "zonelabel.yourusername.netdna-cdn.com"
Now, we have a zone that will host our site's heavy files. It's time to setup our Joomla or WordPress site to use this zone.
Setup CDN for Joomla site
In order to set up CDN for Joomla site to use the MaxCDN zone your created previously, you should download a plugin cdnforjoomla developed by NoNumber. This plugin works with both Joomla 2.5 and 3.x. You can install this plugin as usual through the Joomla Administrator's panel. Go to Extensions > Extensions Manager > Upload Package File and click "Choose File" button. Then select the plugin you downloaded and click the "Upload & Install" button. The plugin will be installed and automatically published.
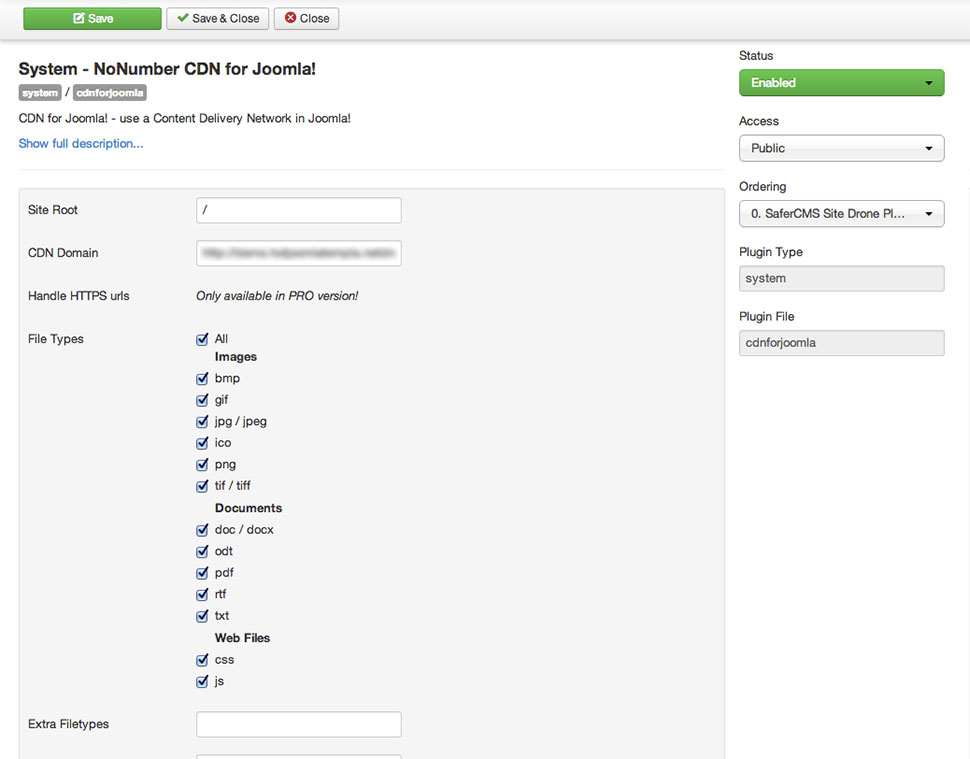
Finally, we should configure the plugin to use our zone on MaxCDN. Go to Extensions > Plugin Manager. Find a system plugin named "System - NoNumber CDN for Joomla!" and click on its name. You should keep the Site Root parameter as "/". For the CDN Domain parameter, copy the zone URL from the MaxCDN control panel. You can select which file types you'd like to serve via CDN, but it's recommended to keep all files selected. After saving the plugin options, you are done!
Check your site now! If you see there are missing images and other files, you probably entered the wrong CDN Domain parameter. Please consult MaxCDN support and un-publish the plugin to restore your site.
Setup CDN for WordPress site
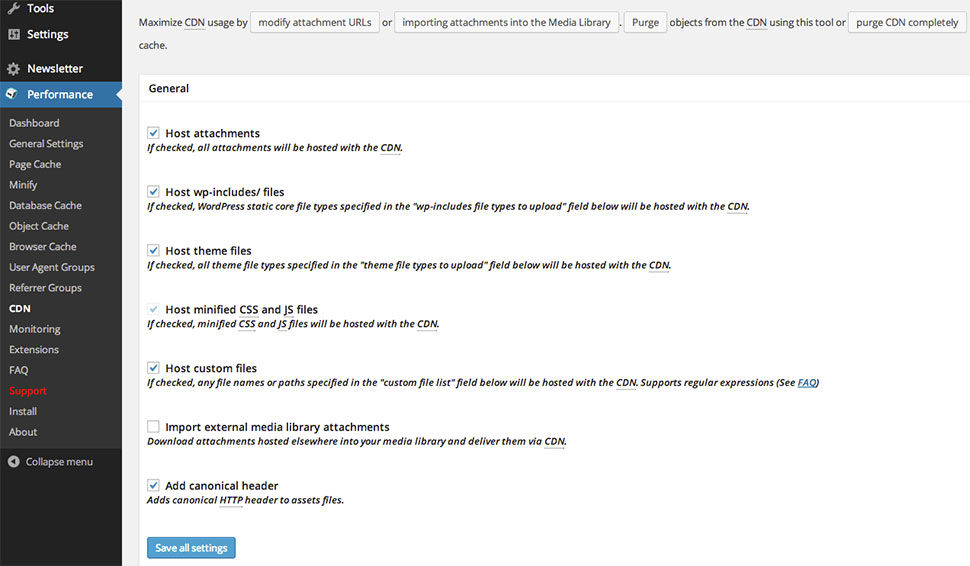
In order to set up CDN for WordPress site to use the MaxCDN zone you created previously, you should install an additional plugin for WordPress. Login to your WordPress Dashboard and go to Plugins > Add New. Search for "W3 Total Cache". The plugin will be listed at the top of the search results, so you can click the "Install" link. After installation, click the "Activate Plugin" link. You will see a new menu item in the Dashboard: Performance. Go to Performance > CDN. In the General section, you can select which files to serve through the CDN.
Proceed to the Configuration section. Make sure you are logged in to your MaxCDN account (in a different tab). Click "Authorize" button next to "Specify account credentials" field. You will be redirected to the MaxCDN site from where you can copy the key. You should see the message "Key is valid" when you paste the key.
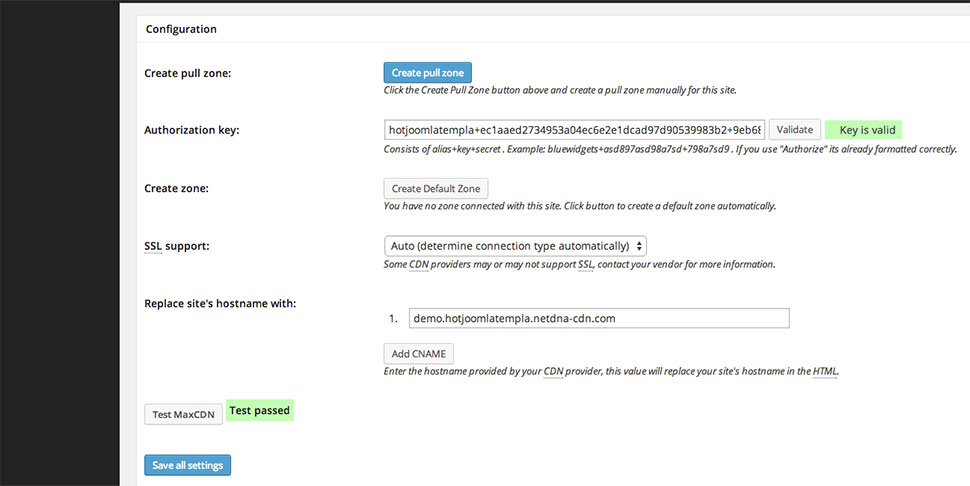
Now, you should enter your MaxCDN zone URL next to the "Replace site's hostname with" field. Click the "Test MaxCDN" button to make sure you entered it correctly. Now you can click "Save all settings" button.
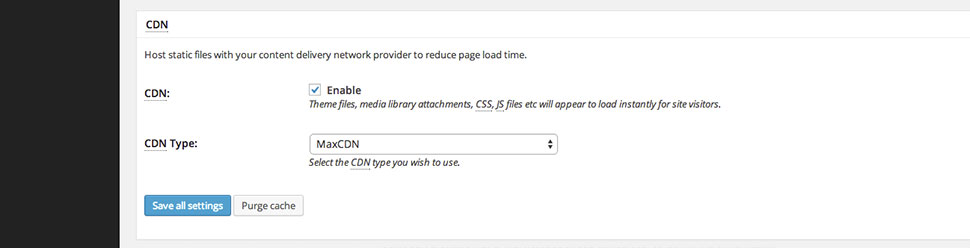
Finally, make sure that CDN support is enabled in the "W3 Total Cache" plugin. Go to Performance > General Settings. Scroll down to the section CDN and make sure the CDN checkbox is checked. If it's not, check it and click "Save All Settings" button.
Check your WordPress site now. If your settings are valid, it should use images and other files from the CDN, not from your local hosting anymore.