The Responsive Lightbox plugin makes a lightbox gallery form the images uploaded in any folder of your site. All you need to do is to specify the folder where the images are uploaded in the code snippet and set the plugin’s parameters.
The plugin is optimized for use on all types of screens, including tablets and smartphones. That’s why it has the Responsive prefix in its name.
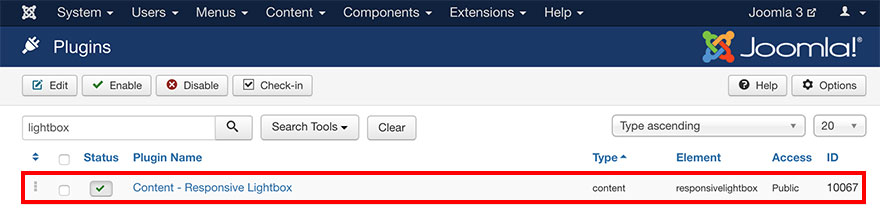
Check if the plugin is installed
To check if this plugin is installed and published, do the following:
- Login to your Joomla Administration panel.
- Go to Extensions > Plugins (Joomla 3.x) or System > Manage > Plugins (Joomla 4.x).
- In the search field enter word “lightbox”.
- One of the results should be plugin “Content - Responsive Lightbox”.
- Make sure that Status of this plugin is published.
The Sparky Framework can work without this plugin. If you think this plugin is not useful to you, feel free to unpublish it.
How to install the plugin if it’s not installed
This plugin is included in the main Sparky Framework package file. If you don’t have this plugin installed, you can extract it from the main package and install it separately:
- Download Sparky Framework from our site.
- Unzip archive “sparky-framework-joomla-vX.X.X.zip” (where X’s are version numbers).
- Inside the “packages” folder, you will see the “responsivelightbox” folder.
- ZIP the folder “responsivelightbox”.
- Login to your Joomla Administration panel.
- Go to Extensions > Manage > Install (Joomla 3.x) or System > Install > Extensions (Joomla 4.x).
- Select ZIP file you made in the step 4 and click Upload & Install button.
How Responsive Lightbox Plugin Works
The plugin makes a set of thumbnail images of all the images from the specified folder. The thumbnail images are displayed where the code snippet for the plugin is entered in your Joomla article. Click on any of these thumbnail images will show the full image in an overlay screen (lightbox). In this overlay screen, you can also view the other images from the set by using left and right navigation arrows.
This plugin creates the thumbnail images automatically from the images available in the folder specified in the code snippet. The plugin will automatically create all thumbnail images (if they are not already created) and save them in the “thumbs” subfolder of the specified folder. The size of the created thumbnails as well as image quality are set in the plugin parameters.
The code snippet for the plugin has this format:
{*responsivelightbox}path/to/images{/responsivelightbox}
In this code snippet, you should change “path/to/images” with a real path (relative to Joomla root folder) where your images are uploaded. Also, delete the * from the code.
Parameters
How the overlay screen will look, what size of the thumbnail images will be used, and other parameters can be set on the plugin’s option page. To reach the plugin’s options page, do the following:
- Login to your Joomla Administration panel.
- Go to Extensions > Plugins (Joomla 3.x) or System > Manage > Plugins (Joomla 4.x).
- In the search field enter word “lightbox”.
- Click on plugin “Content - Responsive Lightbox”.
You will see many parameters available for the plugin on this page.
Lightbox Mode parameter allows you to select a mode for your lightbox. Actually, it will allow you to select the elements that would be included in the lightbox. The available options are:
- With activity indication - Just the activity indication will be displayed (animated icon while images are loading).
- With overlay and activity indication - When lightbox is active, the rest of the site will be covered with an overlay color. The activity indication will be displayed.
- With ‘close’ button and activity indication - Close button will be included in the lightbox. It allows visitor to exit the lightbox mode. The activity indication will be displayed.
- With navigation and activity indication - Navigation dots that allow visitor to browse through the set of your images will be displayed. The activity indication will be displayed.
- With arrows and activity indication - Navigation arrows that allow visitor to browse through the set of your images will be displayed. The activity indication will be displayed.
- Combination - When lightbox is active, the rest of the site will be covered with overlay color. Navigation arrows that allow visitor to browse through the set of images will be displayed. The activity indication will be displayed. Close button will be included in the lightbox.
Background Color parameter sets a background color around your thumbnail images. In order to make this color visible, parameter Padding between Thumbnail Images and Border should not be set to 0.
Background Hover Color parameter allows you to set a different background color around your thumbnail image when mouse pointer is over the thumbnail image.
Overlay Color parameter allows you to cover the rest of the site with an overlay color when lightbox is active. The see the overlay, an appropriate option should be set in the Lightbox Mode parameter. This color should be entered in the RGB format. In this format value “0,0,0” is black color and value “255,255,255” is white color. Note that entering this parameter incorrectly will cause the rest of the site to have transparent background color (value will be ignored).
Border Width parameter allows you to set the border around the thumbnail images. The value is in pixels. If the value is set to 0, the border will not be added.
Border Color parameter sets the color of the border around the thumbnail images, if value for the parameter Border Width is not set to 0.
Border Hover Color parameter allows you to set a different border color around your thumbnail image when mouse pointer is over the thumbnail image.
Horizontal Thumbnail Image Margins and Vertical Thumbnail Image Margins parameters allow you to set some spacing between the thumbnail images. The value in this parameter is in pixels.
Padding between Thumbnail Images and Border parameter allows you to set some spacing between the border and the thumbnail image. If the padding is not set to 0, the parameter Background Color determines the color of the background around the thumbnail images.
Max Thumbnails Width and Max Thumbnails Height parameters determines the maximum horizontal and vertical size of your thumbnail images in pixels.
Please keep in mind this is not the fixed size for your thumbnail images, but the maximum width and height dimension. The proportion of the automatically created thumbnail image will be the same as on the original image.
Thumbnails Image Quality parameter allows you to set value between 0 and 100. This value represents the image quality of the automatically created thumbnail images. Recommended value that should be used for this parameter is between 60 and 90.
Note that a higher value will result in a better quality of the thumbnail images, but also in a bigger size of the image files.
Sample
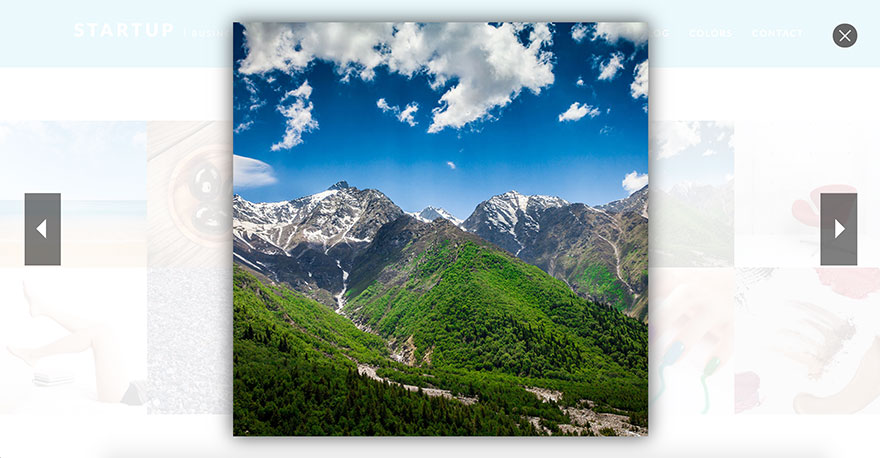
A sample of the responsive lightbox gallery from the Startup template. This template is available for all premium members.