Layout Builder is heart of the Sparky Framework. This is something that saves most of your valuable time. When developing a Joomla template, the most complex and the most time-consuming task is to develop the layout. You need to code a bunch of nested DIV containers, then define dimensions for each of them, write CSS code that will support your layout, and finally put elements inside them (module positions, Joomla content, etc.). Even with CSS frameworks (such as Bootstrap or Foundation), you still need to manually write the code, define dimensions for each element and put elements inside them.
When you are working in the Sparky Framework, all your need is an idea how your site should look and a few minutes to play with the Layout Builder.
Unassigned Elements
This container is located in the top area of the layout builder. It contains many elements ready to be used in your layout. These elements are module positions (gray), menus (green), special features (blue) and main Joomla content (red).
Making the Layout
To make the layout for your site, all you need to do is to select your Grid System, add some rows and drag and drop elements from the Unassigned Elements container to the newly created rows. Let’s explain this by explaining the real-world example.
Task
Imagine you have a design for a site that contains 4 rows. The first row has a logo in 1/4 of the site width and a menu in 3/4 of the site width. The second row has Joomla content in 3/4 of the site width and a right column containing the “right” module position in 1/4 of the site width. The third row is for the footer with 4 equal module positions (bottom1-4). Finally, the fourth row contains just a copyright notice.
From this design, we determine that the grid system of 4 columns is just fine. However, for the same layout, we can also use 8 columns, or 12 columns or even 24 columns, but additional columns are not necessary for this simple, yet very common design.
Solution
- Set value of the Grid System to 4.
- Our layout is empty when we are starting, so let’s add our 4 rows first. Click the Add Row button 4 times to make 4 empty rows.
- Drag Logo feature (blue) and drop it to the first row. Drag menu element (green) and drop it to the first row. Increase its width to 3/4.
- Drag Joomla content element (red) and drop it to the second row. Increase its width to 3/4. Drag the “right” module position (gray) and drop it to the remaining space of the second row.
- One by one, drag 4 Joomla module positions “bottom1”, “bottom2”, “bottom3” and “bottom4” (gray) and drop them to the third row.
- Drag Copyright feature (blue) and drop it to the fourth row. Increase its width to 4/4 (full row width).
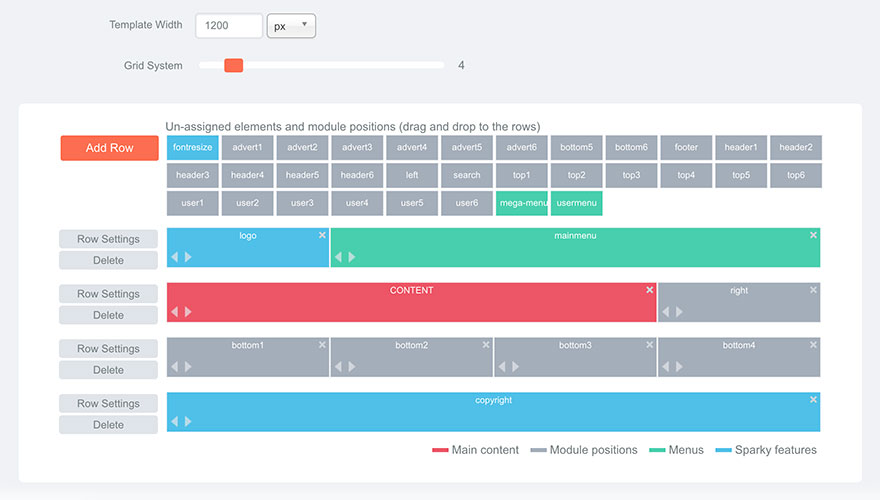
You are done! In less than a minute, your layout is ready! Sparky will take all the dirty work and create HTML and CSS code accordingly to your layout automatically for your site.
Removing Rows and Elements
Sometimes you would need to remove the elements from your layout, maybe because you used a wrong element, or dropped it to the wrong place. You might also want to update layout of your site. There are 2 ways to remove the elements from the layout:
- Remove entire row by clicking Delete button. It’s on the left side of each row. When you delete a row, all elements from this row will be moved back to the container of the unassigned elements.
- Remove certain elements from a row by clicking the small X button in the top right corder of the element. You can also remove an element by dragging it from the row and dropping it to the container of the unassigned elements.
Sample

Layout can be simple, but also very complex. It can be regular, but also very unusual. Play with parameters to make it interesting. This is a sample from the Insurance company template. This template is available for all premium members.